Tuesday, October 17, 2006

Rust no more! - 'tis done - see the 1st October post for the original object.


Here's some close-ups of various places to show the mark-making & texture created by marks (and a little moulding paste & tissue overlay).


paint, sand, oil pastel, pencil scratched into the oil pastel, soft pastel scratched into other pastel... and so on! This one has some moulding paste beneath the pastel & pencil to give some texture, and some charcoal broken into the paper & dye dry-brushed over oil pastel, soft pastel & pencil.
Later on, I'll post about my trip to Ally Pally - more stash enhancement & some inspiration.

Wednesday, October 11, 2006

Just in case you didn't think knitting was obsessive

The Last Knit

fabulous Finnish animation.

Monday, October 09, 2006

I am dead. With this sock (& it's partner) I have been killed by a deadly combination of VonJela & Amanda.

Good fitting socks, seriously bright stripes, but I quite like the combination for a day when I'm not feeling subtle!

So, no more Rib of Doom for me, but there's still a fair amount of ribbing going on in my knitting bag!

This is how the commissioned waistcoat is looking so far:

I think the Mackenzie tweed has a feel to it of being "hardwearing" ! The silk in it is certainly on the rough side - not overly worked, one might say (i.e. there's rough tufty slubs of it in the yarn).

It does look suitably tweedy, and it'll certainly be a warm layer that won't wear out in a hurry!

The pattern however, is not for the knitter who is sewing-phobic. The pocket bands, armhole bands & front buttonhole/button band are all knitted (more 1x1 ribbing!) separately & then sewn on. "slightly stretched" sewing-on of bands is not my favourite pastime, but it'll finish the waistcoat off nicely - although I am trying to come up with devious plans of knitting on the bands , but I can't quite see how that'll quite work with vertical ribbing... maybe picking up and knitting the end stitch with the edge stitch? (kind-of like how an applied I-cord edging would be knitted on?) Still, I'm not entirely convinced, might just have to put up with the sewing!

I put the ribbing aside for an evening last night & made these for a friend who's just had a baby girl:

The sole is made from sheepskin so they're all fluffy inside!

The most dificult part was trying to make holes in the sheepskin - if I make many more of these I'll have to invest in a leather punch as my standard hole punch just couldn't cope! Other than that they were easy to make - all done in the round & with no sewing!

I hope they'll keep Emmeline's feet all snuggly & toasty warm over the winter.

Right, back to the ribbing & I need to study the Knitting & Stitching Show catalogue a bit more closely & plan my "must-see" stands for the weekend.

Friday, October 06, 2006

The rusty object continues

wednesdays efforts resulted in this:

A large piece of paper with torn edges, with a wash of grey/green acrylic applied. Then tissue paper & sand/pva glue mix to add some texture.

I did actually begin to add some colour and more texture on wednesday, but um, the whole class found that perhaps a bit too much texture had been added!

We were advised to bring in some wire wool for thursday!


Thursday was spent doing actual mark-making to build the surface & represent the rust & texture rather than just using paint/pastel/pigment/pencil.


this is at the end of thursday:

You can still see the moulding paste and tissue etc. at the top of the sheet, but the bottom looks a bit more like rust & degraded plastic!


Here's some detail:

There's layers & layers of oil pastel, soft pastel and pencil over the paint, trying to re-create the surface texture.

I am getting there, but it's certainly going to need a lot more work.

I also has a tutorial on wednesday - we talked a bit about the course & how I've found it with having had no art background (I was a scientist/engineer) and it is weird. The language used is different, the ways to describe my work have had to be re-learnt & the context of materials and processes has been expanded.

I'm really looking forward to the next few months & using knitting in different ways - wait for the pictures - I've got ideas for knitting & silicone, resin & even fireworks!

Sunday, October 01, 2006

Back to College

It is good to be back, but to a different studio - on the 4th floor rather than the basement (& the lift's not working - wheeze - it'll make me fitter!). Lots more light & some stunning views across the countryside - I'll take photos of the view next week - to one side, St. Ives, round to another side, St. Agnes beacon & further around to the Basset monument on Carn Brea.

This week's work however is all about TEXTURE - how to show texture on a flat surface, demonstrate it & really build effects.

first some samples - in monochrome black & white using pencil, pastel, paint, sand, wax, tissue, moulding paste, glue, scratching, rubbing, splattering ... marking paper & marking into other marks - layering one medium over another

This is the state of my desk:

At the top is my sketchbook with marks on tissue stuck in - this exercise lead onto the other bits lying around on my desk, especially this:


yup, a rusty, decayed looking piece of junk. It's actually part of a road sign where the steel beneath the plastic coating has rusted out so badly that it burst through the plastic. I collected a piece of the plastic, the inside is most interesting. Bits of green algae, rust spots & staining - loads of texture & colour.

So what have I got to do with this?

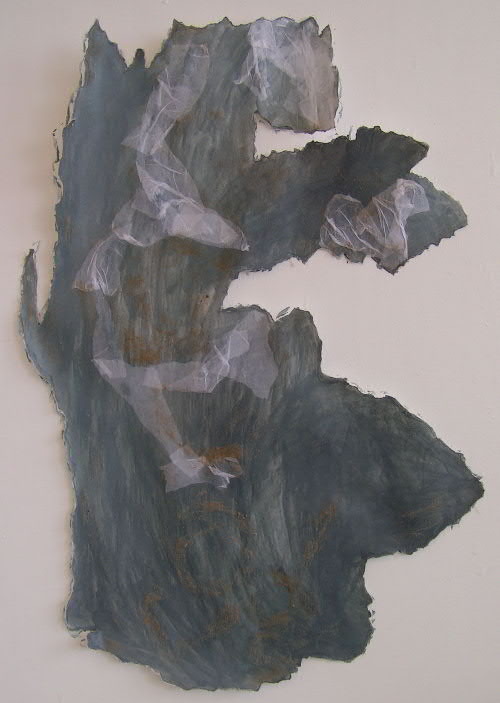
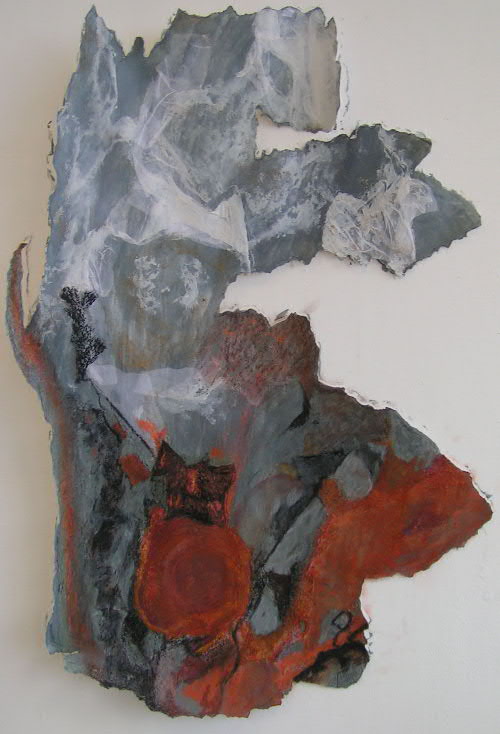
1. take a piece of bread and butter paper (bigger than A1 size) and tear out the outline of my decayed "object" to fit the paper.

2. using paint, tissue, sand, wax, pastel, pencil...modrock, whatever! - recreate the surface texture on the piece of paper.

Not scary at all then!


Here's some "practice" bits (c'wise from left)

modrock stuck to paper and painted with soft pastel, Koh-i-noor dyes

modrock stuck to paper and painted with soft pastel, Koh-i-noor dyes & oil pastel

sand stuck to paper with wax

I really like the way that the soft pastel blends into the modrock plaster with water & becomes quite a subtle layer of colour that can be built upon. The wax and sand is great, but will probably need to be used towards the end & in moderation.
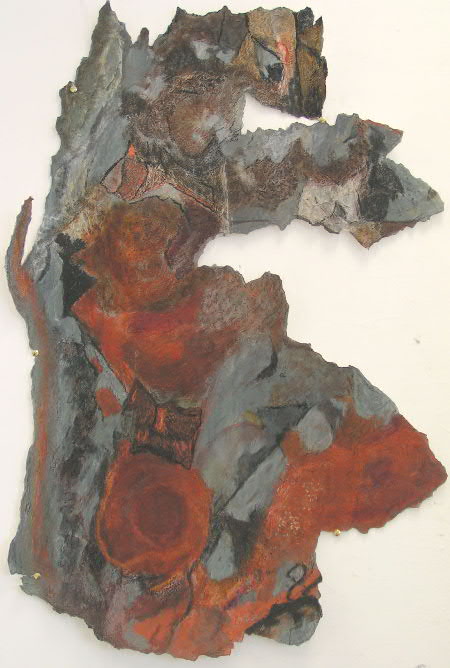
Sock Wars...

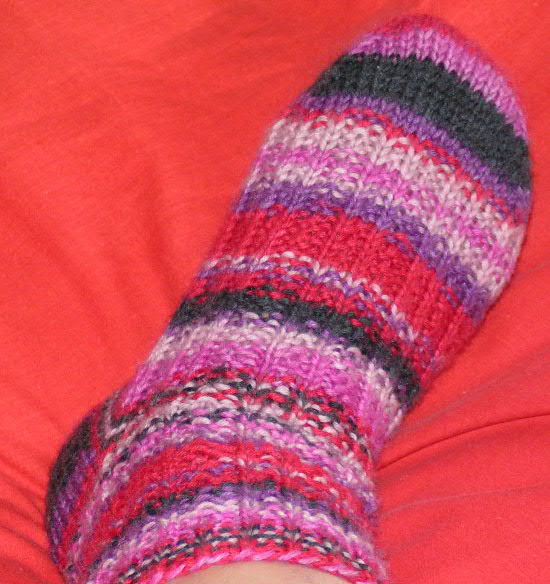
These were posted to the USA on thursday afternoon, so I'm still "alive" so far!

Knitted with a stashed ball-&-a-bit of Rowan Felted Tweed - yummy stuff but not so good for the "Rib of Doom" - it's a bit too textured really, but these are snuggly socks with an alpaca content and machine washable too :)

I hope they fit my "target" properly. I think that with most of my ribbing, they'll look better after a wash & a "blocking" (i.e. wearing).